1
| class UIBezierPath : NSObject
|
UIBezierPath 是由直线和曲线线段组成的路径,可以在自定义视图中渲染该路径。它属于 UIKit 框架。
最初使用 UIBezierPath 这个类只是为了指定路径的几何形状,如矩形、椭圆和弧,也可以定义混合了直线和曲线线段的复杂多边形。定义形状之后,您可以使用这个类的其他方法在当前绘图上下文中呈现路径。
UIBezierPath 对象在渲染过程中将路径的几何形状与描述路径的属性组合在一起。可以分别设置几何图形和属性,并可以独立地更改它们。
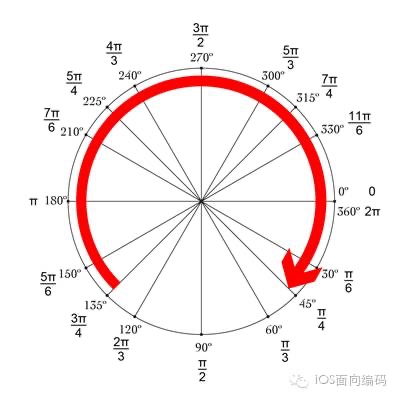
当通过 UIBezierPath 绘制圆时,其其实角度和方向如下图所示:

基本API的使用
便捷初始化器绘制路径

1
2
3
4
5
6
7
8
9
10
11
12
13
14
15
16
17
18
19
20
21
22
23
24
25
26
27
28
29
30
31
32
33
34
35
36
37
38
39
40
41
42
43
44
45
46
47
48
49
50
51
52
53
54
55
56
57
58
59
60
61
62
63
64
65
66
67
68
69
70
71
72
73
74
75
76
77
78
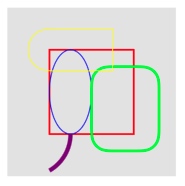
| override func draw(_ rect: CGRect) {
let rectPath = UIBezierPath(rect: CGRect(x: 50, y: 50, width: 100, height: 100))
rectPath.lineWidth = 2.0
UIColor.red.setStroke()
rectPath.close()
rectPath.stroke()
let ovalPath = UIBezierPath(ovalIn: CGRect(x: 50, y: 50, width: 50, height: 100))
ovalPath.lineWidth = 1.0
UIColor.blue.setStroke()
ovalPath.close()
ovalPath.stroke()
let roundPath = UIBezierPath(roundedRect: CGRect(x: 100, y: 70, width: 80, height: 100), cornerRadius: 20)
roundPath.lineWidth = 3.0
UIColor.green.setStroke()
roundPath.close()
roundPath.stroke()
let byRoundPath = UIBezierPath(roundedRect: CGRect(x: 25, y: 25, width: 100, height: 50), byRoundingCorners: [.topLeft, .bottomLeft], cornerRadii: CGSize(width: 20, height: 50))
byRoundPath.lineWidth = 1.0
UIColor.yellow.setStroke()
byRoundPath.close()
byRoundPath.stroke()
let arcPath = UIBezierPath(arcCenter: CGPoint(x: 25, y: 150), radius: 50, startAngle: 0, endAngle: CGFloat.pi / 3, clockwise: true)
arcPath.lineWidth = 5.0
UIColor.purple.setStroke()
arcPath.stroke()
}
```
### 影响绘制的基本属性
1、绘制一条线,设置线条的起始端点样式,连接处的形状,曲线的平坦度
```swift
override func draw(_ rect: CGRect) {
let path = UIBezierPath()
path.move(to: CGPoint(x: 50, y: 50))
path.addLine(to: CGPoint(x: 50, y: 150))
path.addLine(to: CGPoint(x: 150, y: 150))
path.addArc(withCenter: CGPoint(x: 100, y: 100), radius: 50, startAngle: 0, endAngle: -CGFloat.pi / 2, clockwise: false)
path.lineWidth = 10
UIColor.red.setStroke()
path.lineCapStyle = .round
path.lineJoinStyle = .round
path.stroke()
}
|
2、填充路径使用的规则
当使用如下两种规则来判断当前区域是否填充时,需要在该路径区域内给定的一点向路径边界外的一点绘制一条射线,然后按照如下规则判断是否填充:
- even-odd rule(奇偶规则填充),如果射线与路径交叉总数为奇数则填充该点所在的区域,为偶数则不填充。
- non-zero rule(非零环绕数原则),从左到右的路径相交计数为+1,从右到左的路径相交计数为-1。如果交叉点的和非零,则该点所在区域被填充;如果和为0,则不填充该区域。
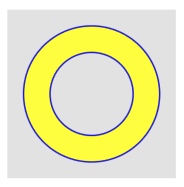
下面例子我们外圆使用顺时针方向绘制,内圆使用逆时针方向绘制:

1
2
3
4
5
6
7
8
9
10
11
12
13
14
15
16
17
18
19
20
21
22
23
24
25
26
27
| override func draw(_ rect: CGRect) {
let outerPath = UIBezierPath()
outerPath.addArc(withCenter: CGPoint(x: 100, y: 100), radius: 80, startAngle: 0, endAngle: CGFloat.pi * 2, clockwise: true)
outerPath.close()
let innerPath = UIBezierPath()
innerPath.addArc(withCenter: CGPoint(x: 100, y: 100), radius: 50, startAngle: 0, endAngle: CGFloat.pi * 2, clockwise: false)
innerPath.close()
let path = UIBezierPath()
path.append(outerPath)
path.append(innerPath)
path.usesEvenOddFillRule = true
UIColor.blue.setStroke()
path.lineWidth = 3.0
path.stroke()
UIColor.yellow.setFill()
path.fill()
}
|
3、带有混合模式的描边和填充
blendMode: 混合模式决定了如何和已经存在的被渲染过的内容进行合成。具体可以参看:Core Graphics 混合模式的各种表现
1
2
3
4
5
6
7
8
9
10
11
12
13
14
| override func draw(_ rect: CGRect) {
let outerPath = UIBezierPath(rect: CGRect(x: 50, y: 50, width: 100, height: 100))
UIColor.red.setFill()
outerPath.close()
outerPath.fill()
let innerPath = UIBezierPath(rect: CGRect(x: 75, y: 75, width: 50, height: 50))
UIColor.blue.setFill()
innerPath.close()
innerPath.fill(with: .difference, alpha: 1.0)
}
|
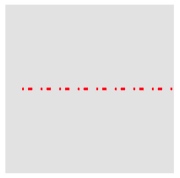
4、以虚线的形式描边路径

1
2
3
4
5
6
7
8
9
10
11
12
13
14
15
16
17
| override func draw(_ rect: CGRect) {
let path = UIBezierPath()
path.move(to: CGPoint(x: 20, y: 100))
path.addLine(to: CGPoint(x: 200, y: 100))
let dotLine: [CGFloat] = [2, 5, 5, 10]
path.setLineDash(dotLine, count: dotLine.count, phase: 0)
path.lineWidth = 3.0
UIColor.red.setStroke()
path.stroke()
}
|
学习博客
iOS开发 UIBezierPath学习
iOS UIBezierPath(贝塞尔曲线)


