Core Graphics ,也称为 Quartz 2D,是可用于iOS,tvOS和macOS应用程序开发的高级二维绘图引擎。只要有可能,Quartz 2D就会充分利用图形硬件(Graphics hardware)的能力。
我们可以使用 Core Graphics 框架来处理:
路径(创建、绘制、裁剪)
模式(Patterns)
抗锯齿渲染(anti-aliased Rendering)
变换(Transforms)
颜色管理(Color and Color Spaces)
离屏渲染(Offscreen Rendering)
渐变和阴影
透明层(transparency layers)
图像数据管理
创建图像和图像蒙板(Bitmap Images and Image Masks)
创建PDF文档、显示和解析等功能
在iOS中,Quartz 2D 可以与所有可用的图形和动画技术(例如 Core Animation,OpenGL ES 和 UIKit)一起工作,来完成复杂的功能。
在Mac OS X中,Quartz 2D可以与所有其他图形和成像技术一起工作——Core Image、Core Video、OpenGL和QuickTime。
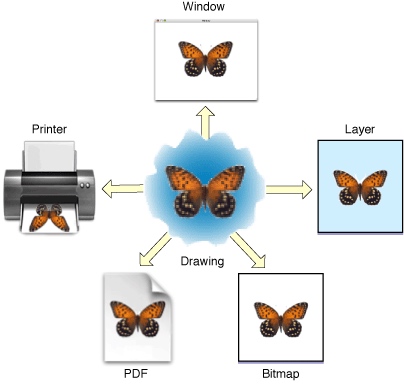
基本概念理解 Graphics Context(图形上下文) Graphics Context 表示绘图的目的地(Drawing Destinations),其目的地可以是应用程序中的窗口、位图图像、PDF文档、打印机等。
Graphics Context 包含绘图所需参数 和 绘图系统执行任何后续绘图命令所需的所有设备特定信息。他定义了基本的绘图属性,例如绘图时使用的颜色、裁剪区域、线宽和样式信息、字体信息、组合选项,以及其他一些属性。Quartz 中的所有对象都绘制到图形上下文或包含在图形上下文中。
1 typedef struct CGContext CGContextRef ;
Graphics Context 在代码中由数据类型CGContextRef 表示,这是一种不透明的数据类型(opaque data type)。
开发者们利用typedef声明一个类型,把它叫做不透明类型,希望其他人别去把它重新转化回对应的那个标准C类型。
当使用Quartz绘制时,所有不同类型设备的特征都包含在您使用的特定类型的图形上下文中。我们只需向相同序列的Quartz绘图例程提供不同的图形上下文,就可以将相同的图像绘制到不同的设备上,如下图是Quartz的绘图目标:
可以通过 Quartz上下文创建函数、Mac OS X框架、iOS中的UIKit框架中的高级函数来获得图形上下文。
在iOS中通过UIKit框架提供的高级函数来获得图形上下文
1
2
3
4
5
6
7
class MyQuartzView : UIView override func draw (_ rect: CGRect) let context = UIGraphicsGetCurrentContext () } }
1
2
3
4
extension CGContext init ?(consumer: CGDataConsumer , mediaBox: UnsafePointer <CGRect >?, _ auxiliaryInfo: CFDictionary? ) init ?(_ url: CFURL , mediaBox: UnsafePointer <CGRect >?, _ auxiliaryInfo: CFDictionary? ) }
1
2
3
4
public typealias CGBitmapContextReleaseDataCallback = @convention (c ) (UnsafeMutableRawPointer? , UnsafeMutableRawPointer? ) -> Void extension CGContext init ?(data: UnsafeMutableRawPointer? , width: Int , height: Int , bitsPerComponent: Int , bytesPerRow: Int , space: CGColorSpace , bitmapInfo: UInt32 ) }
Quartz 2D不透明数据类型 除了图形上下文之外,Quartz 2D API还定义了各种不透明的数据类型。因为其数据类型属于 Core Graphics 框架,所有命名时都使用CG前缀。Quartz 2D从应用程序操作的不透明数据类型创建对象,以实现特定的绘图输出。
Quartz 2D中可用的不透明数据类型有:CGPathRef、CGImageRef、CGLayerRef、CGPatternRef、CGShadingRef、CGGradientRef、CGFunctionRef、CGColorRef 等等,具体可以参看Quartz 2D Opaque Data Types
Graphics States(图形状态) Quartz 根据当前 Graphics States 下的参数修改绘图操作的结果。
图形上下文包含一组图形状态,当Quartz创建图形上下文时,堆栈是空的。保存图形状态时,Quartz会将当前图形状态的副本推送到堆栈上。恢复图形状态时,Quartz会从堆栈顶部弹出图形状态。弹出的状态变为当前状态。
1
2
3
4
5
let context = UIGraphicsGetCurrentContext ()context?.saveGState() context?.restoreGState()
与图形状态相关联的参数有:CTM、Clipping area、Line: width, join, cap, dash, miter limit、flatness、Anti-aliasing setting、Color: fill and stroke settings、Alpha value (transparency)、Rendering intent、Color space: fill and stroke settings、Text: font, font size, character spacing, text drawing mode、Blend mode
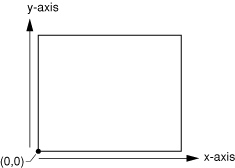
Quartz 2D坐标系 Quartz的默认坐标系如下图,原点位于页面的左下角
有些技术使用与Quartz不同的默认坐标系来设置图形上下文。如下方式中的上下文是与Quartz的默认坐标系相匹配:
在iOS中,由UIView返回的一种绘图上下文。
在iOS中,通过调用UIGraphicsBeginImageContextWithOptions函数创建的绘图上下文。
UIKit使用的默认坐标系统与Quartz使用的坐标系统不同。UIView对象修改了Quartz图形上下文的CTM,通过将原点转换到视图的左上角,并通过将y轴乘以-1来翻转y轴来匹配UIKit约定。
Quartz 2D的内存管理 Quartz使用Core Foundation内存管理模型,在该模型中对对象进行引用计数。
Path(路径) 路径定义一个或多个形状或子路径。子路径可以由直线、曲线或两者都组成。它可以打开或关闭。子路径可以是简单的形状,如直线、圆形、矩形或星形,也可以是更复杂的形状。Quartz支持基于路径的绘图。
路径创建和路径绘制是独立的任务。首先创建一个路径。当您想渲染一个路径时,您请求Quartz绘制它。可以选择描边路径、填充路径、或者同时描边和填充路径,还可以使用路径来创建剪切区域。
路径的绘制 给图形上下文构造一个路径时,是通过 context?.beginPath() 来给Quartz发送信号。接着设置路径的第一个点context?.move(to: ) 或者 第一个形状,然后就可以在路径上添加直线,圆弧和曲线。在进行下面的操作时,需要注意一下几点:
在开始创建新路径之前,调用函数beginPath()
开始绘制线、弧和曲线时需要通过 move(to:)设置起始点,或者通过便利函数来隐式地完成此工作。
当调用 closePath() 关闭子路径时,会将子路径的起始点连接。后续的路径调用将开始新的子路径,即使您没有显式地设置新的起始点。
当画圆弧时,Quartz会在圆弧的当前点和起点之间绘制一条直线。
绘制椭圆和矩形时,Quartz将新的封闭子路径添加到该路径。
最后必须调用绘画功能来填充fillPath()或描边strokePath()路径,因为创建路径并不会绘制路径。
1
2
func move (to point: CGPoint) func addLine (to point: CGPoint)
1
2
3
4
5
6
7
8
9
10
11
12
13
14
15
16
17
18
19
20
21
22
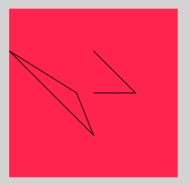
override func draw (_ rect: CGRect) let context = UIGraphicsGetCurrentContext () context?.beginPath() context?.move(to: CGPoint (x: 0 , y: 50 )) context?.addLine(to: CGPoint (x: 100 , y: 150 )) context?.addLine(to: CGPoint (x: 80 , y: 100 )) context?.closePath() let points = [CGPoint (x: 100 , y: 100 ), CGPoint (x: 150 , y: 100 ), CGPoint (x: 100 , y: 50 )] context?.addLines(between: points) context?.strokePath() }
1 func addArc (center: CGPoint, radius: CGFloat, startAngle: CGFloat, endAngle: CGFloat, clockwise: Bool)
1
2
3
4
5
6
7
8
9
10
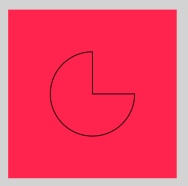
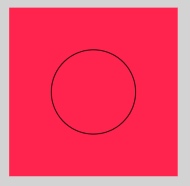
override func draw (_ rect: CGRect) let context = UIGraphicsGetCurrentContext () context?.beginPath() context?.move(to: CGPoint (x: 100 , y: 100 )) context?.addArc(center: CGPoint (x: 100 , y: 100 ), radius: 50 , startAngle:0 , endAngle: -CGFloat .pi / 2 , clockwise: false ) context?.closePath() context?.strokePath() }
画正圆
1
2
3
4
5
6
override func draw (_ rect: CGRect) let context = UIGraphicsGetCurrentContext () context?.beginPath() context?.addArc(center: CGPoint (x: 100 , y: 100 ), radius: 50 , startAngle: 0 , endAngle: CGFloat .pi * 2 , clockwise: true ) context?.strokePath() }
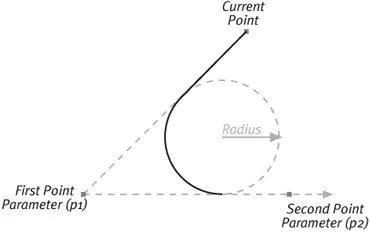
1 2 func addArc (tangent1End: CGPoint, tangent2End: CGPoint, radius: CGFloat)
1
2
3
4
5
6
7
8
9
10
11
12
13
14
15
16
17
18
19
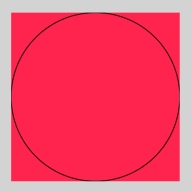
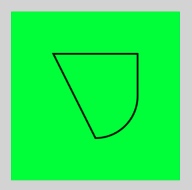
override func draw (_ rect: CGRect) let context = UIGraphicsGetCurrentContext () context?.beginPath() context?.move(to: CGPoint (x: 0 , y: 100 )) let radius: CGFloat = 100 context?.addArc(tangent1End: CGPoint (x: 0 , y: 0 ), tangent2End: CGPoint (x: 100 , y: 0 ), radius: radius) context?.addArc(tangent1End: CGPoint (x: 200 , y: 0 ), tangent2End: CGPoint (x: 200 , y: 100 ), radius: radius) context?.addArc(tangent1End: CGPoint (x: 200 , y: 200 ), tangent2End: CGPoint (x: 100 , y: 200 ), radius: radius) context?.addArc(tangent1End: CGPoint (x: 0 , y: 200 ), tangent2End: CGPoint (x: 0 , y: 100 ), radius: radius) context?.closePath() context?.strokePath() }
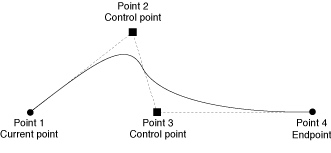
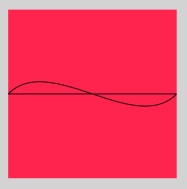
1 func addCurve (to end: CGPoint, control1: CGPoint, control2: CGPoint)
1
2
3
4
5
6
7
8
9
10
override func draw (_ rect: CGRect) let context = UIGraphicsGetCurrentContext () context?.beginPath() context?.move(to: CGPoint (x: 0 , y: 100 )) context?.addCurve(to: CGPoint (x: 200 , y: 100 ), control1: CGPoint (x: 50 , y: 50 ), control2: CGPoint (x: 150 , y: 150 )) context?.closePath() context?.strokePath() }
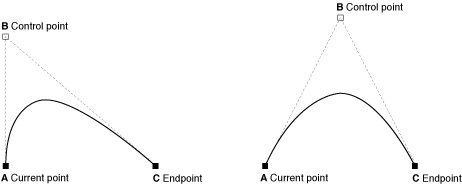
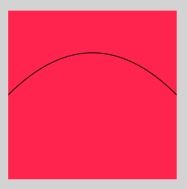
1 func addQuadCurve (to end: CGPoint, control: CGPoint)
1
2
3
4
5
6
7
8
override func draw (_ rect: CGRect) let context = UIGraphicsGetCurrentContext () context?.beginPath() context?.move(to: CGPoint (x: 0 , y: 100 )) context?.addQuadCurve(to: CGPoint (x: 200 , y: 100 ), control: CGPoint (x: 100 , y: 0 )) context?.strokePath() }
1
2
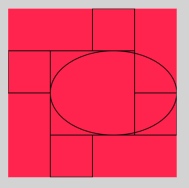
func addRect (_ rect: CGRect) func addEllipse (in rect: CGRect)
1
2
3
4
5
6
7
8
9
10
11
12
13
14
15
16
17
override func draw (_ rect: CGRect) let context = UIGraphicsGetCurrentContext () context?.beginPath() context?.addRect(CGRect (x: 50 , y: 50 , width: 100 , height: 100 )) let rects = [CGRect (x: 0 , y: 50 , width: 50 , height: 50 ), CGRect (x: 100 , y: 0 , width: 50 , height: 50 ), CGRect (x: 150 , y: 100 , width: 50 , height: 50 ), CGRect (x: 50 , y: 150 , width: 50 , height: 50 )] context?.addRects(rects) context?.closePath() context?.addEllipse(in : CGRect (x: 50 , y: 50 , width: 150 , height: 100 )) context?.closePath() context?.strokePath() }
创建路径 如上操作在图形上下文中绘制完路径后,它会从图形上下文中清除。当绘制复杂的场景时,你想重复的使用路径,这就需要Quartz提供的 CGPathRef 和 CGMutablePathRef 类型。通过 CGMutablePath() 创建可变的CGPath对象,并向其中添加直线,圆弧,曲线和矩形。path函数操作CGPath对象,而不是图形上下文。Quartz提供了一组CGPath函数,与 CGContext 的一些函数并行。
1
2
3
4
5
6
7
8
9
10
11
12
13
14
override func draw (_ rect: CGRect) let path = CGMutablePath () path.move(to: CGPoint (x: 50 , y: 50 )) path.addLine(to: CGPoint (x: 150 , y: 50 )) path.addArc(tangent1End: CGPoint (x: 150 , y: 150 ), tangent2End: CGPoint (x: 50 , y: 150 ), radius: 50 ) path.closeSubpath() let context = UIGraphicsGetCurrentContext () context?.addPath(path) context?.replacePathWithStrokedPath() context?.strokePath() }
描边路径
1
2
3
4
5
6
7
8
9
10
11
12
13
14
15
16
17
18
19
20
21
22
23
24
25
26
27
28
29
30
31
32
33
34
35
36
37
38
39
40
41
42
43
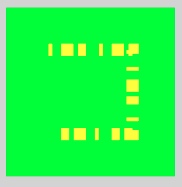
override func draw (_ rect: CGRect) let path = CGMutablePath () path.move(to: CGPoint (x: 50 , y: 50 )) path.addLine(to: CGPoint (x: 150 , y: 50 )) path.addLine(to: CGPoint (x: 150 , y: 150 )) path.addLine(to: CGPoint (x: 100 , y: 150 )) path.addLine(to: CGPoint (x: 50 , y: 150 )) let context = UIGraphicsGetCurrentContext () context?.addPath(path) context?.setLineWidth(15 ) context?.setLineCap(CGLineCap .butt) context?.setLineDash(phase: 0 , lengths: [5 , 10 , 15 ]) context?.setStrokeColorSpace(CGColorSpaceCreateDeviceRGB ()) context?.setStrokeColor(UIColor .yellow.cgColor) context?.strokePath() }
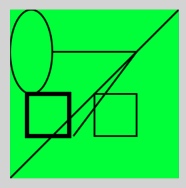
描边路径的方式,包括一些便利功能用于绘制矩形或椭圆形:
1
2
3
4
5
6
7
8
9
10
11
12
13
14
15
16
17
18
19
20
21
22
23
24
25
26
27
28
29
30
override func draw (_ rect: CGRect) let path = CGMutablePath () path.move(to: CGPoint (x: 50 , y: 50 )) path.addLine(to: CGPoint (x: 150 , y: 50 )) path.addLine(to: CGPoint (x: 75 , y: 150 )) let context = UIGraphicsGetCurrentContext () context?.addPath(path) context?.setLineWidth(2 ) context?.setStrokeColor(UIColor .black.cgColor) context?.strokePath() context?.stroke(CGRect (x: 100 , y: 100 , width: 50 , height: 50 )) context?.stroke(CGRect (x: 20 , y: 100 , width: 50 , height: 50 ), width: 5 ) context?.strokeEllipse(in : CGRect (x: 0 , y: 0 , width: 50 , height: 100 )) context?.strokeLineSegments(between: [CGPoint (x: 200 , y: 0 ), CGPoint (x: 0 , y: 200 )]) }
填充路径 当填充当前路径时,Quartz把路径中包含的子路径都被闭合了,然后它使用这些封闭的子路径并计算要填充的像素。Quartz有两种计算填充面积的方法:
1、 简单的路径具有明确定义的区域,例如:矩形和椭圆
2、 路径由重叠的部分组成,或者如果路径包含多个子路径。则有两个规则用于确定填充区域:
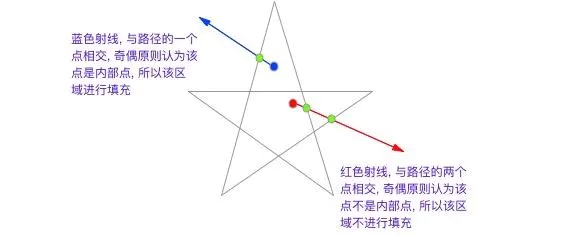
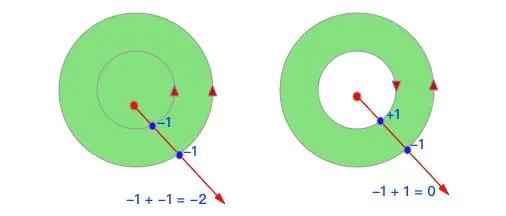
默认的填充规则,称为 nonzero winding number rule (非零环绕数原则)。如果要确定是否应该绘制特定的点,则从该点开始向绘图的边界之外画一条线。从0开始计数,当路径段从左到右穿过这条线时,将计数加1,从右往左则减1。如果最后结果为0,则不绘制该点。否则渲染该点。绘制路径段的方向会影响结果。
奇偶规则(even-odd rule),要确定是否应该绘制特定的点,可以从该点开始向绘图的边界之外画一条线,计算这条线穿过的路径段的数量。如果路径段的总数是奇数,则绘制点,否则则不绘制点。
具体理解可以参考iOS 绘图中的 FillMode 填充模式 中所提供示意图:
如下是 Apple 的官方配图:
1
2
3
4
5
6
7
8
9
10
11
12
13
14
15
16
17
18
19
20
21
22
23
24
25
26
27
28
29
30
31
32
33
34
35
36
37
38
39
40
41
42
43
override func draw (_ rect: CGRect) let outPath = CGMutablePath () outPath.addArc(center: CGPoint (x: 100 , y: 100 ), radius: 100 , startAngle: 0 , endAngle: CGFloat .pi * 2 , clockwise: true ) let inPath = CGMutablePath () inPath.addArc(center: CGPoint (x: 100 , y: 100 ), radius: 50 , startAngle: 0 , endAngle: CGFloat .pi * 2 , clockwise: true ) let basePath = CGMutablePath () basePath.addPath(outPath) basePath.addPath(inPath) let context = UIGraphicsGetCurrentContext () context?.addPath(basePath) context?.setFillColor(UIColor .yellow.cgColor) context?.fillPath(using: .evenOdd) }
Anti-Aliasing(抗锯齿渲染) Anti-Aliasing 是指在绘制文本或形状时,人为地纠正位图图像中的锯齿(或锯齿)边缘的过程。
当图形分辨率低于眼睛分辨率时,就会出现锯齿边缘。Quartz 对围绕形状轮廓的像素使用了不同的颜色,通过这种方式混合颜色,形状看起来很平滑。
Bitmap 和 UIKit 提供的 Graphics Contexts 都支持 anti-aliasing。
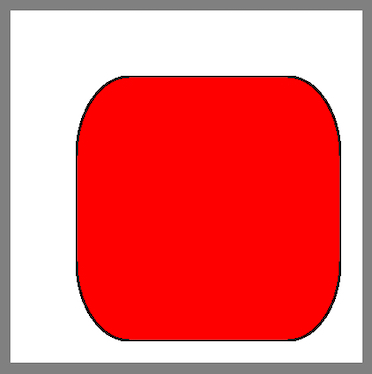
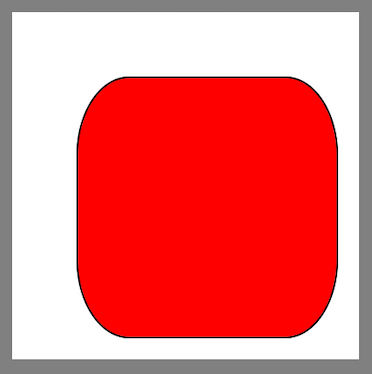
setShouldAntialias 是图形状态参数;setallowsatialiasing 不是图形状态参数。如下图所示锯齿图和反锯齿图的比较:
1
2
3
4
5
6
7
8
9
10
11
12
13
14
15
16
17
18
override func draw (_ rect: CGRect) var scaleT = CGAffineTransform (scaleX: 1.5 , y: 1.5 ) let path = CGPath (roundedRect: CGRect (x: 25 , y: 25 , width: 100 , height: 100 ), cornerWidth: 20 , cornerHeight: 30 , transform: &scaleT) let context = UIGraphicsGetCurrentContext () context?.addPath(path) context?.setShouldAntialias(true ) context?.setAllowsAntialiasing(true ) context?.setStrokeColor(UIColor .black.cgColor) context?.setFillColor(UIColor .red.cgColor) context?.drawPath(using: .fillStroke) }
混合模式(Blend Modes) 混合模式指定 Quartz 如何在背景上着色,其实就是前景图和背景图怎么混合叠加绘制。混合模式影响着绘制。
Quartz默认使用普通的混合模式,该模式使用以下公式将前景色和背景色组合。当颜色的 alpha = 1.0 时,通过下面公式,我们可以得出对于不透明的颜色,当使用普通混合模式进行绘制时,任何在背景之上绘制的内容完全遮挡背景上的绘图。
1 result = (alpha * foreground) + (1 - alpha) * background
可以通过 func setBlendMode(_:) 函数传递混合模式常量,实现各种效果;
混合模式是图形状态的一部分。如果在更改混合模式之前使用了函数 context?.saveGState(),那么调用函数 context?.restoreGState() 会将混合模式重置为普通模式;
如下代码,可以参照 Apple Setting Blend Modes 文档查看混合模式效果。
1
2
3
4
5
6
7
8
9
10
11
12
13
14
15
16
17
18
19
20
21
22
23
24
25
26
27
28
29
30
31
32
33
34
35
36
37
38
39
override func draw (_ rect: CGRect) let context = UIGraphicsGetCurrentContext () context?.beginPath() context?.setFillColor(red: 207 / 255.0 , green: 194 / 255.0 , blue: 141 / 255.0 , alpha: 1.0 ) context?.addRect(CGRect (x: 0 , y: 50 , width: 200 , height: 25 )) context?.fillPath() context?.setFillColor(red: 201 / 255.0 , green: 202 / 255.0 , blue: 204 / 255.0 , alpha: 1.0 ) context?.addRect(CGRect (x: 0 , y: 75 , width: 200 , height: 25 )) context?.fillPath() context?.beginPath() context?.setFillColor(red: 227 / 255.0 , green: 106 / 255.0 , blue: 161 / 255.0 , alpha: 1.0 ) context?.addRect(CGRect (x: 0 , y: 100 , width: 200 , height: 25 )) context?.fillPath() context?.setFillColor(red: 165 / 255.0 , green: 219 / 255.0 , blue: 102 / 255.0 , alpha: 1.0 ) context?.addRect(CGRect (x: 0 , y: 125 , width: 200 , height: 25 )) context?.fillPath() context?.setBlendMode(.normal) context?.beginPath() context?.setFillColor(red: 168 / 255.0 , green: 127 / 255.0 , blue: 180 / 255.0 , alpha: 1.0 ) context?.addRect(CGRect (x: 50 , y: 0 , width: 25 , height: 200 )) context?.fillPath() context?.beginPath() context?.setFillColor(red: 234 / 255.0 , green: 153 / 255.0 , blue: 58 / 255.0 , alpha: 1.0 ) context?.addRect(CGRect (x: 75 , y: 0 , width: 25 , height: 200 )) context?.fillPath() context?.beginPath() context?.setFillColor(red: 62 / 255.0 , green: 148 / 255.0 , blue: 218 / 255.0 , alpha: 1.0 ) context?.addRect(CGRect (x: 100 , y: 0 , width: 25 , height: 200 )) context?.fillPath() context?.beginPath() context?.setFillColor(red: 165 / 255.0 , green: 219 / 255.0 , blue: 102 / 255.0 , alpha: 1.0 ) context?.addRect(CGRect (x: 125 , y: 0 , width: 25 , height: 200 )) context?.fillPath() }
Using Blend Modes With Images iOS中使用blend改变图片颜色
裁剪路径 剪切区域是从一个用作遮罩的路径创建的,它允许您屏蔽页面中不想绘制的部分。Quartz只在裁剪区域内呈现绘制,出现在剪切区域的闭合子路径内的绘制是可见的,发生在剪切区域的封闭子路径之外的绘图是不可见的。
最开始创建图形上下文时,剪切区域包括上下文的所有可绘制区域。您可以通过设置当前路径,然后使用剪切函数而不是绘图函数来更改剪切区域。
裁剪区域是图形状态的一部分。若要将剪辑区域恢复到以前的状态,可以在剪辑之前保存图形状态context?.saveGState(),并在完成剪辑绘制后恢复图形状态context?.restoreGState()。
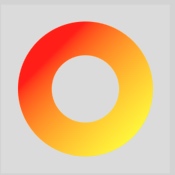
1、如下给图形上下文设置红色到黄色渐变的背景色,通过一个圆环路径进行裁剪:
1
2
3
4
5
6
7
8
9
10
11
12
13
14
15
16
17
18
19
20
21
22
23
24
override func draw (_ rect: CGRect) let context = UIGraphicsGetCurrentContext () context?.beginPath() let arcCenter = CGPoint (x: rect.size.width / 2 , y: rect.size.height / 2.0 ) context?.addArc(center: arcCenter, radius: 80 , startAngle: CGFloat (0 ), endAngle: CGFloat (Double .pi*2 ), clockwise: false ) context?.addArc(center: arcCenter, radius: 40 , startAngle: CGFloat (Double .pi*2 ), endAngle: CGFloat (0 ), clockwise: true ) context?.closePath() context?.clip(using: .evenOdd) let colorSpace = CGColorSpace (name: CGColorSpace .genericRGBLinear) let components: [CGFloat ] = [1.0 , 0 , 0 , 1.0 , 1.0 , 1.0 , 0.0 , 1.0 ] let locations: [CGFloat ] = [0.3 , 0.8 ] let gradient = CGGradient (colorSpace: colorSpace!, colorComponents: components, locations: locations, count : 2 ) let startPt = CGPoint (x: 0 , y: 0 ) let endPt = CGPoint (x: rect.width, y: rect.height) context?.drawLinearGradient(gradient!, start: startPt, end: endPt, options: .drawsBeforeStartLocation) }
2、将剪切路径设置为 当前剪切路径 与 由指定矩形定义的区域 的交点
1
2
3
4
5
6
7
8
context?.beginPath() let arcCenter = CGPoint (x: rect.size.width / 2.0 , y: rect.size.height / 2.0 )context?.addArc(center: arcCenter, radius: 50 , startAngle: 0 , endAngle: CGFloat .pi * 2 , clockwise: true ) context?.closePath() context?.clip() context?.clip(to: CGRect (x: arcCenter.x, y: arcCenter.y, width: 100 , height: 100 ))
3、将mask映射到指定的矩形中,并使其与图形上下文的当前剪切区域相交。
1
2
3
4
5
6
context?.beginPath() context?.addRect(rect) context?.closePath() context?.clip() context?.clip(to: CGRect (x: 50 , y: 50 , width: 100 , height: 100 ), mask: (UIImage (named: "ear" )?.cgImage!)!)
学习博客 Quartz 2D编程指南
Quartz2D for iOS Sample Code
理解CGContextAddArcToPoint
Color and Color Spaces
Color Management Overview
iOS 2D绘图详解
Quartz 2D(一)概念、图形上下文、路径
Core Graphics 学习(一)
